


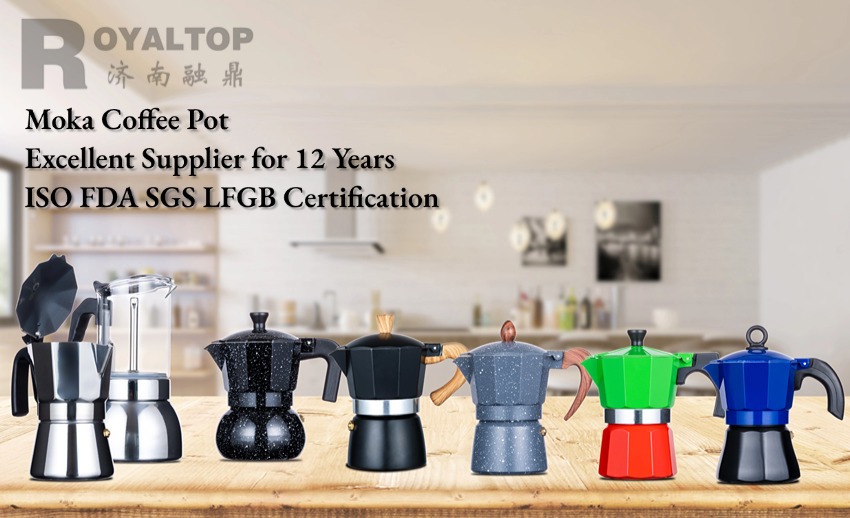
Product Description
How do you make an espresso using an aluminum mocha pot while camping?
Making an espresso in an aluminum moka pot while camping is definitely a great way to enhance your camping experience! Aluminum moka kettles are lightweight and conduct heat quickly, making them perfect for outdoor use. Here are the detailed steps and key considerations:
## ☕ Gear Required.
1. **Aluminum Moka Kettle:** Make sure it is clean and dry.
2. **Freshly Ground Coffee Powder:** **Medium Fineness** (similar to the coarseness of fine salt or sanding sugar), suitable for the grind of a mocha pot. Grind it ahead of time at home and keep it sealed, or grind it fresh at camp if you have a grinder.
3. **Water:** Clean, potable water (cold or room temperature water is fine).
4. **Heat source:**
* **Camping Gas Stove:** The most common and relatively controllable heat (recommended).
* **Alcohol Stove:** Mild fire, slightly longer heating time.
* **Wood Stoves/Campfires:** ** Very skillful! ** Must use steady embers or coals and avoid direct contact with large flames. A stabilizing stand may be required.
5. **Heated Gloves or Thick Cloth:** For holding a boiling hot mocha pot.
6. **Small spoon or spatula:** For filling with ground coffee.
7. **(Optional) Cup:** To prepare to catch the coffee.
## Operating Procedure
1. **Preparing the lower jug (boiler):**
** Unscrew the moka pot and remove the upper pot and powder chute.
* **Critical Step:** Pour **cold water** into the lower pot. The amount of water must be **below the bottom of the safety relief valve**! Usually there is a marked line (Max or ⏊) inside the lower jug. ** Never exceed this line! ** Cold water is used to avoid premature pressure and to allow enough time for the coffee grounds to be evenly extracted.
* **Water quality:** It is recommended to use your own drinking water. Avoid directly using stream or lake water that may contain impurities or odors.
2. **Filling the powdered coffee:**
* Place the powder slot on the lower pot spout.
**Use a spoon to pour **freshly ground medium-fine coffee powder** into the powder chute, allowing it to naturally mound up.
* **Key tips:**
* ** Do not compact! ** This is the biggest difference between a moka pot and an espresso machine. Simply use the back of a spoon or your finger ** to gently smooth ** the surface of the powdered coffee so that it is evenly distributed. Pressing will result in poor water flow, excessive pressure, or even extraction failure or sputtering.
* **Powder amount:** Just fill the powder tank, it's okay to pile up a small mountain, after smoothing the powder surface will be slightly below the edge of the tank. **Do not deliberately press down to fill. **
3. **Assembling the Moka Pot:**
* Make sure the edge of the powder slot and the mouth of the lower pot are clean and free of coffee powder residue.
* Align the upper pot with the lower pot (make sure the seal on the bottom of the upper pot is in the correct position).
* Tighten the upper and lower pots ** moderately by hand**. Aluminum pots have soft threads, **Avoid over-tightening** to prevent damage to the threads or deformation resulting in a poor seal. Screw until you feel resistance, then add a little more force to ensure a tight seal.
4. **Heating:**
* Place the assembled moka pot smoothly on the camping stove.
* ** KEY: Use low to medium heat! ** Aluminum moka kettles conduct heat extremely quickly, ** absolutely avoid large flames ! ** Especially with open flames (e.g., gas stoves, wood fires), the flame height **does not exceed the bottom edge of the lower kettle**, ideally the flame just wraps around the bottom of the kettle. A large flame can quickly scorch the coffee, resulting in a bitter taste, or even damage the bottom of the pot (aluminum can soften and deform) or disable the safety valve, which is very dangerous.
* Turn on the stove and start heating.
* **Keep the lid of the pot open:** so that you can observe the extraction process.
5. **Observe the extraction process:**
* After a few minutes (the time depends on the heat source, the amount of water, and the ambient temperature), you will hear the sound of water boiling and steam pressure building up inside the lower kettle (gurgling).
* Soon, the hot, dark brown coffee liquid will begin to flow upward from the center column and into the upper pot.
* The coffee liquid flows out initially darker in color (Crema) and gradually becomes lighter.
* **Key:** Listen for changes in sound. When the flow rate of coffee liquid accelerates significantly, the sound changes from a continuous “fizz” or “plop” to a sound similar to “spitting bubbles” or “boiling”, and the liquid flows into the upper pot, the color is darker at the beginning (Crema), and gradually becomes lighter. “ sound, and out of the coffee color becomes very light (close to golden yellow or colorless), ** immediately turn off the heat! ** At this point, most of the essence has been extracted, and then continue to cook will only come out of the burnt and bitter “tail water”. 6.
6. **Remove from heat and cool:** ** Immediately** **Remove from heat and cool.
* Remove the kettle from the heat source **IMMEDIATELY**.
* Remove the kettle from the heat source. Wrap the bottom of the kettle in a damp cloth or place it on wet grass (to ensure it is safe and stable) to accelerate the cooling process and stop the internal extraction. Or let it cool naturally for a few seconds. Aluminum jugs cool relatively quickly.
7. **Enjoy:**
* Wait a little 10-20 seconds for the pressure inside the jug to stabilize.
* ** Careful! ** At this point the entire mocha kettle is very hot! Be sure to wear insulated gloves or use a thick cloth.
* Pour the coffee into a preheated mug and enjoy. Moka pot coffee has a lower pressure than home espresso machines, so it produces a cup closer to the strength of an espresso or Americano, but with a strong, concentrated flavor that is perfect for refreshing yourself outdoors.
8. **Cleaning:**
**Let the moka pot **completely cool** before disassembling for cleaning. ** NEVER ** rinse with cold water while boiling hot; aluminum expands and contracts violently with heat and is easily deformed.
**After disassembly, rinse all parts (top jug, bottom jug, powder tank, seals) with clean water. You can use a soft cloth or soft brush to gently brush the powder tank and center tube.
* ** Do not use detergent! ** Residual detergent will destroy the coffee flavor. If grease stains are heavy, use a little at most and then be sure to rinse thoroughly.
* **Air thoroughly** and store to prevent odors or mold. Aluminum oxidizes easily and it is important to dry it completely.
## ️ Special Considerations for Camping with Aluminum Moka Pots
1. **Fire control is central:** Aluminum conducts heat quickly, making it very easy to burn coffee or damage the pot. **Medium-low heat! Medium-low heat! Medium-low heat! ** Can't be emphasized enough. Use over a campfire is extremely risky and requires extreme caution.
2. **Safety first:**
* **Stay away from flammable materials:** Make sure there are no flammable materials such as hay, leaves, tents, etc. around the stove and moka pot.
* **Watch the fire:** Do not leave while heating.
* **Safety Valve:** Make sure the safety valve is unobstructed; it is the safety of last resort. Never flood it when adding water.
* **Anti-scalding:** Consider the pot boiling hot at all times and use insulated gloves to operate it.
* **Stable Placement:** Make sure that both the stove and the moka pot are placed on a firm, level plane.
3. **Seal Check:** Check that the rubber seal on the bottom of the upper kettle is intact and flexible before traveling. Deteriorated seals can cause water and air leaks and prevent proper pressurization.
4. **Effect of Altitude:** At high altitude, the boiling point of water is lowered, which may affect the extraction time and effect, you need to slightly extend the heating time or try to fine-tune the amount of powder/grinding (usually the effect is not much difference, just operate according to the normal process).
5. **Preheating (optional):** If you want to speed up, you can use a little bit of hot water (not hot enough) to inject the lower pot, but the risk is that if the assembly is slow, the water may become warm or even cold. Cold water is safer and more reliable.
Follow these steps and precautions and you'll be able to easily enjoy a fragrant and refreshing cup of homemade espresso at your campsite! ☕ Have a great camping trip and great coffee!
Product Information
| Brand: | Royaltop |
| Product Name: | Moka Coffee Maker |
| Use: | Espresso Maker |
| Suitable: | Home Kitchen Office Camping |
| Capacity: | 1 cup, 2 cup, 3 cup, 6 cup, 9 cup, 12 cup, 14 cup |
| Shape: | Octagonal |
| Body Material: | Aluminium |
| Powder bowl material: | Aluminium |
| Seal: | Silicone |
| Top knob: | Plastic, or wood |
| Handle material: | Plastic, or wood |
| Colour: | Silver, black, red, customized |
| Trademark: | Screen printing |
| Packaging: | Colourful box |
| Samples: | Available |
| Delivery time: | 15~30 days |
| Model No. | Capacity(ml) | Weight(g) | Height(cm) | Bottom Diameter(cm) | Handle Length(cm) | Colour Box Size (cm) |
| 1 cup | 50 | 150 | 12 | 6 | 5 | 9.3*7.8*13.5 |
| 2 cup | 100 | 210 | 14 | 7 | 6 | 11.5*8*15 |
| 3 cup | 150 | 240 | 15 | 8 | 7 | 12*9.3*16 |
| 6 cup | 300 | 330 | 18.5 | 9 | 9 | 14*10*20 |
| 9 cup | 450 | 480 | 21 | 10 | 10 | 15.5*11*22.5 |
| 12 cup | 600 | 560 | 23.5 | 11.5 | 11 | 17*13*25 |
| 14 cup | 700 | 760 | 27.5 | 12.5 | 11 | 18*14*27.5 |


